Drei Renderings, eine RAW-Datei
Entwickeln Sie dieselbe RAW-Datei getrennt für Schatten, Mitteltöne und Lichter. Kombinieren Sie diese über einstellbare Beiträge und Maskenreichweiten und prüfen Sie jede Belichtung und Maske direkt.
DYNARAW 2.0 · macOS

Eine RAW-Datei. Drei Belichtungen.
Jede Mischung im Griff.
DynaRaw 2.0 ist ein RAW-Prozessor, bei dem Bilddetails im Mittelpunkt stehen. Entwickeln Sie Schatten, Mitteltöne und Lichter getrennt, prüfen Sie die Beitragsmasken und bestimmen Sie jede Tonwertänderung selbst.
Version 2.0.0 wartet auf die App-Store-Prüfung. Aktuell veröffentlicht ist Version 1.3.6.
DEN WORKFLOW ERLEBEN
Eine kommentierte Demo zu Belichtungsmischung, Beitragsmasken und Prüfung in voller Auflösung. Englischer Kommentar · 3 Min. 25 Sek. Mit der früheren HDR-Oberfläche aufgenommen; die Screenshots oben zeigen 2.0.0.
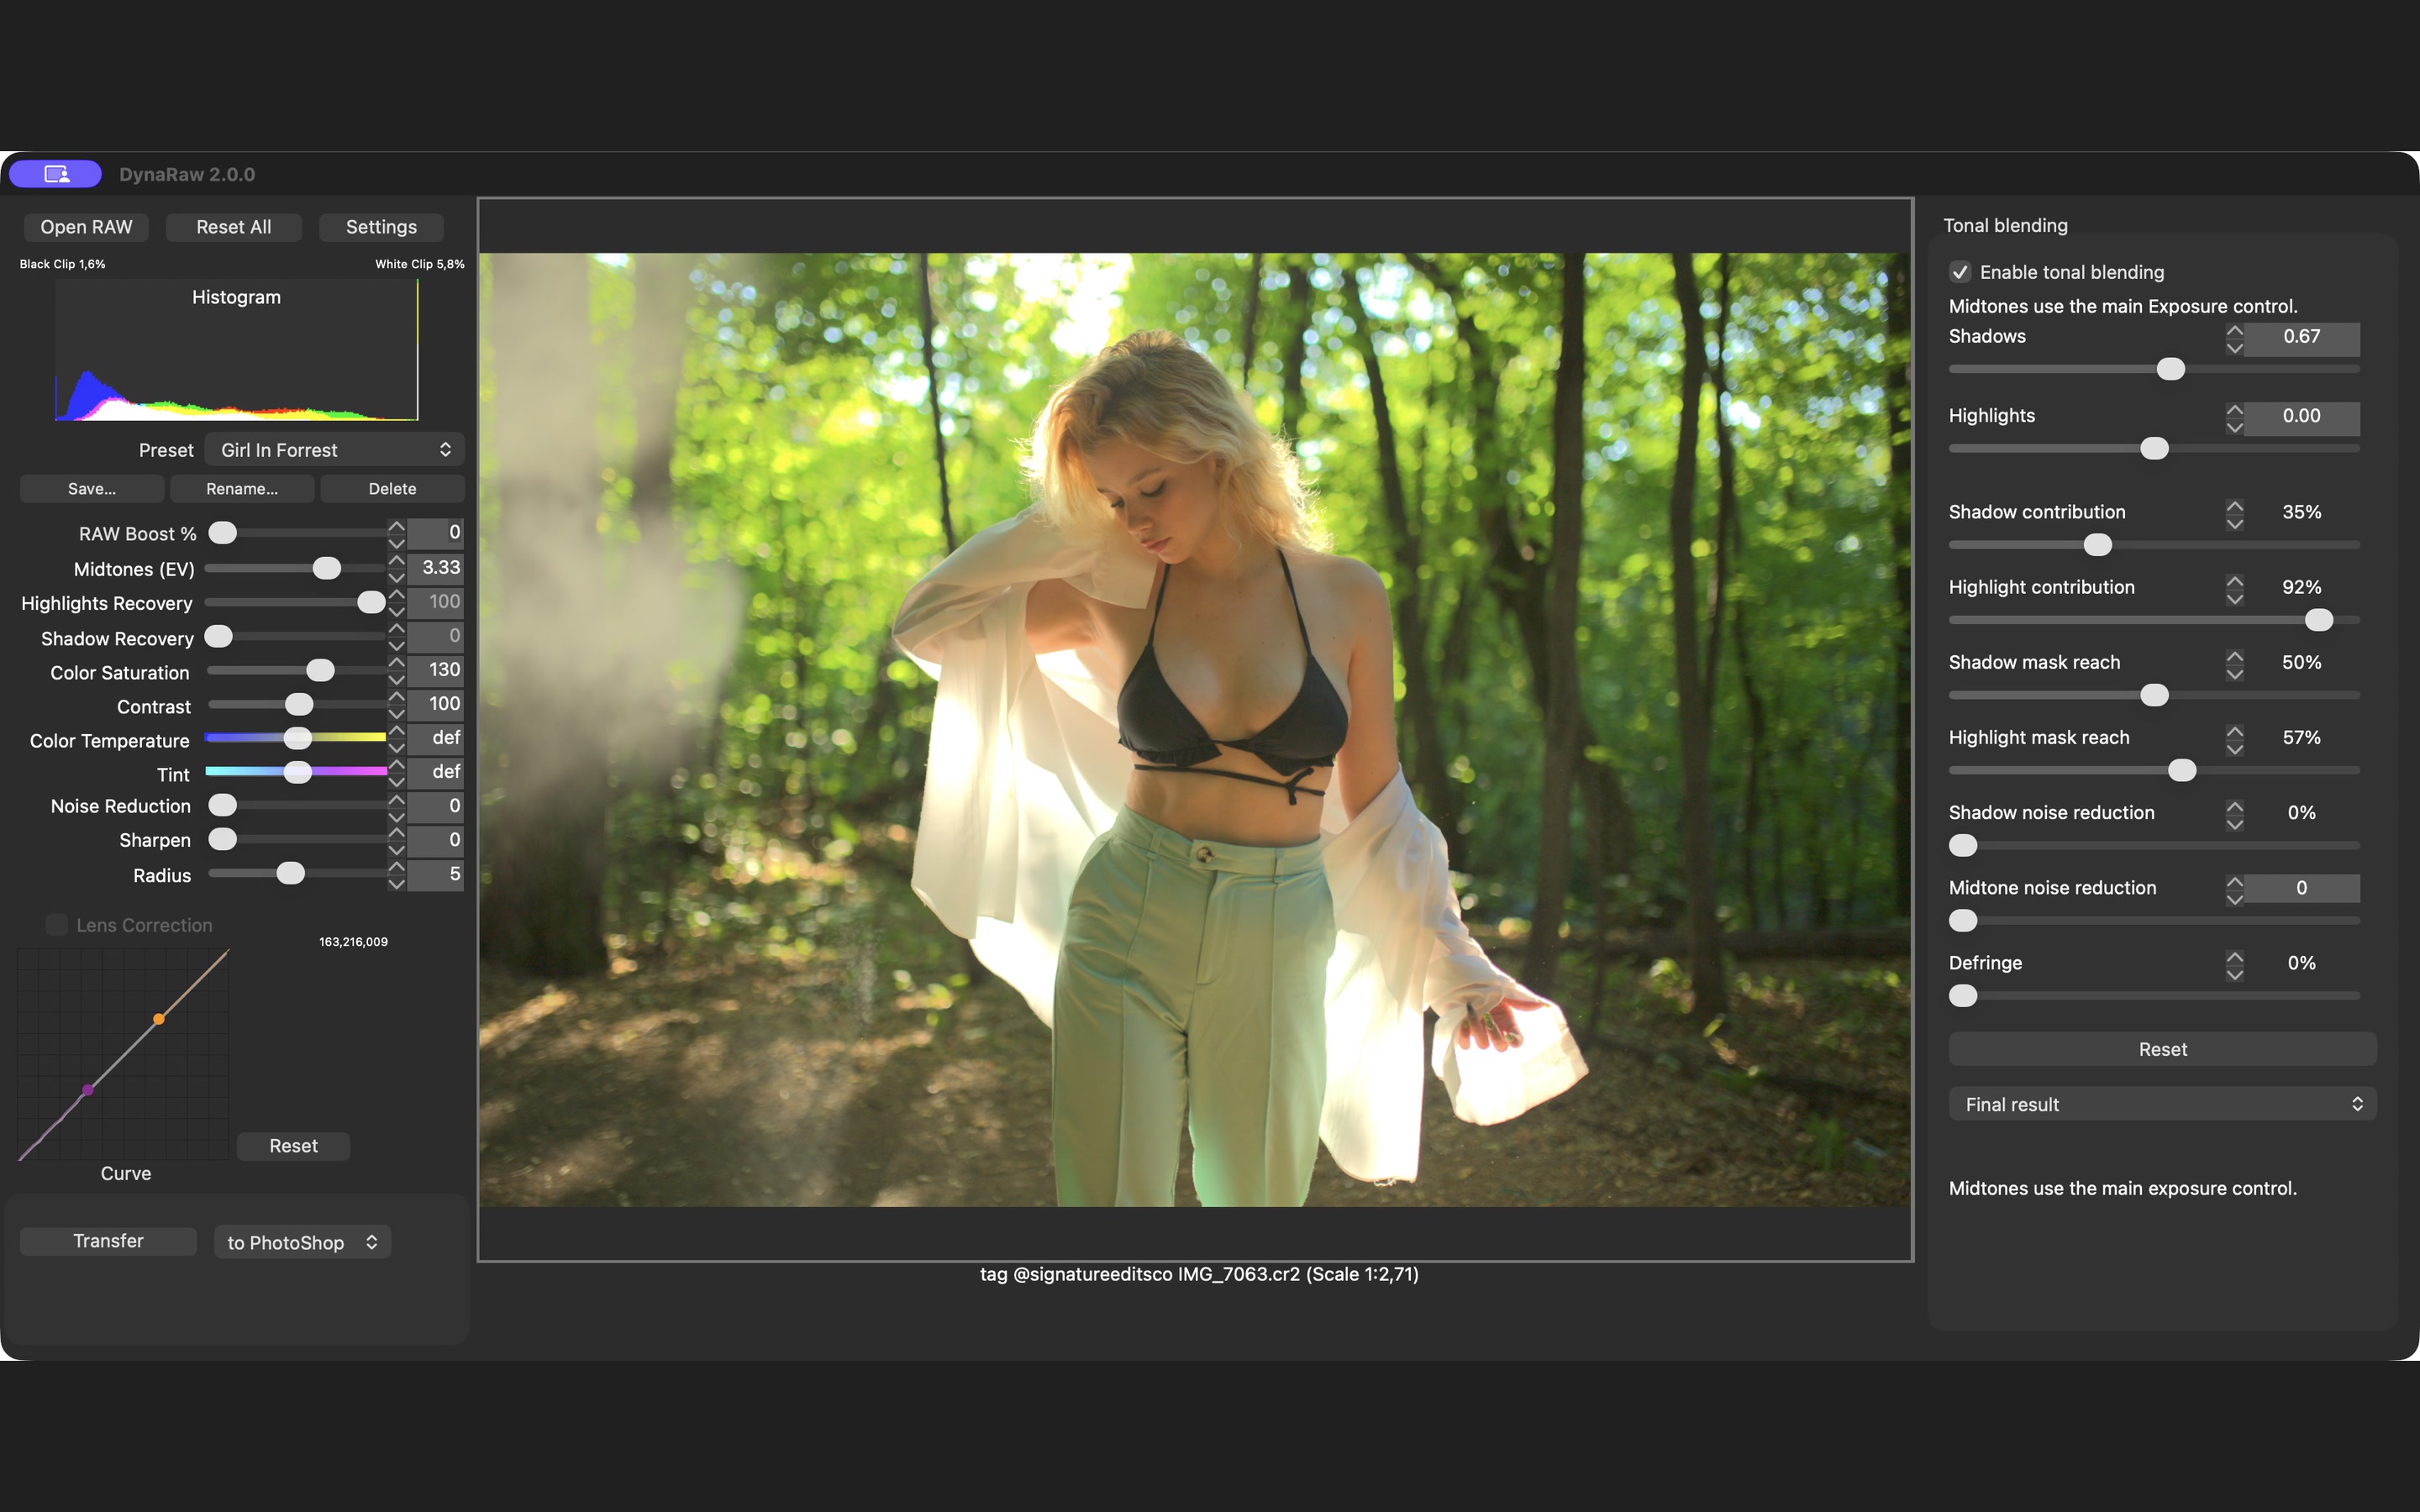
This portrait is a good test for tonal blending. The woman stands in deep woodland shade, while direct sunlight catches her hair, white shirt, and the leaves behind her. The raw file contains useful information at both ends of that range, but a single global exposure cannot present it all cleanly.
With tonal blending switched off, Dyna Raw behaves like a conventional raw processor. The main Exposure control changes the whole photograph. The current midtone setting gives a plausible starting point, but the face remains subdued and the brightest fabric and foliage are already close to clipping.
Push that one exposure higher and the face and forest open up, but the sunlit shirt and hair lose structure. Pull the exposure lower and those highlights become safer, but the face and background sink into shadow. Neither rendering is wrong. Each contains detail the other cannot show at the same time.
Tonal blending keeps those useful renderings separate. The main Exposure setting remains the midtone anchor. A brighter raw rendering can supply selected shadow information, and a darker rendering can supply selected highlight information. Dyna Raw combines them in floating point, instead of flattening the image with hidden automatic tone mapping.
Here is the shadow exposure used by this preset. It contains the lift needed around the face and in the woodland. Here is the highlight exposure. It holds back the white shirt, bright hair, and sunlit leaves. The final image does not simply average the two; it uses each only where it is useful.
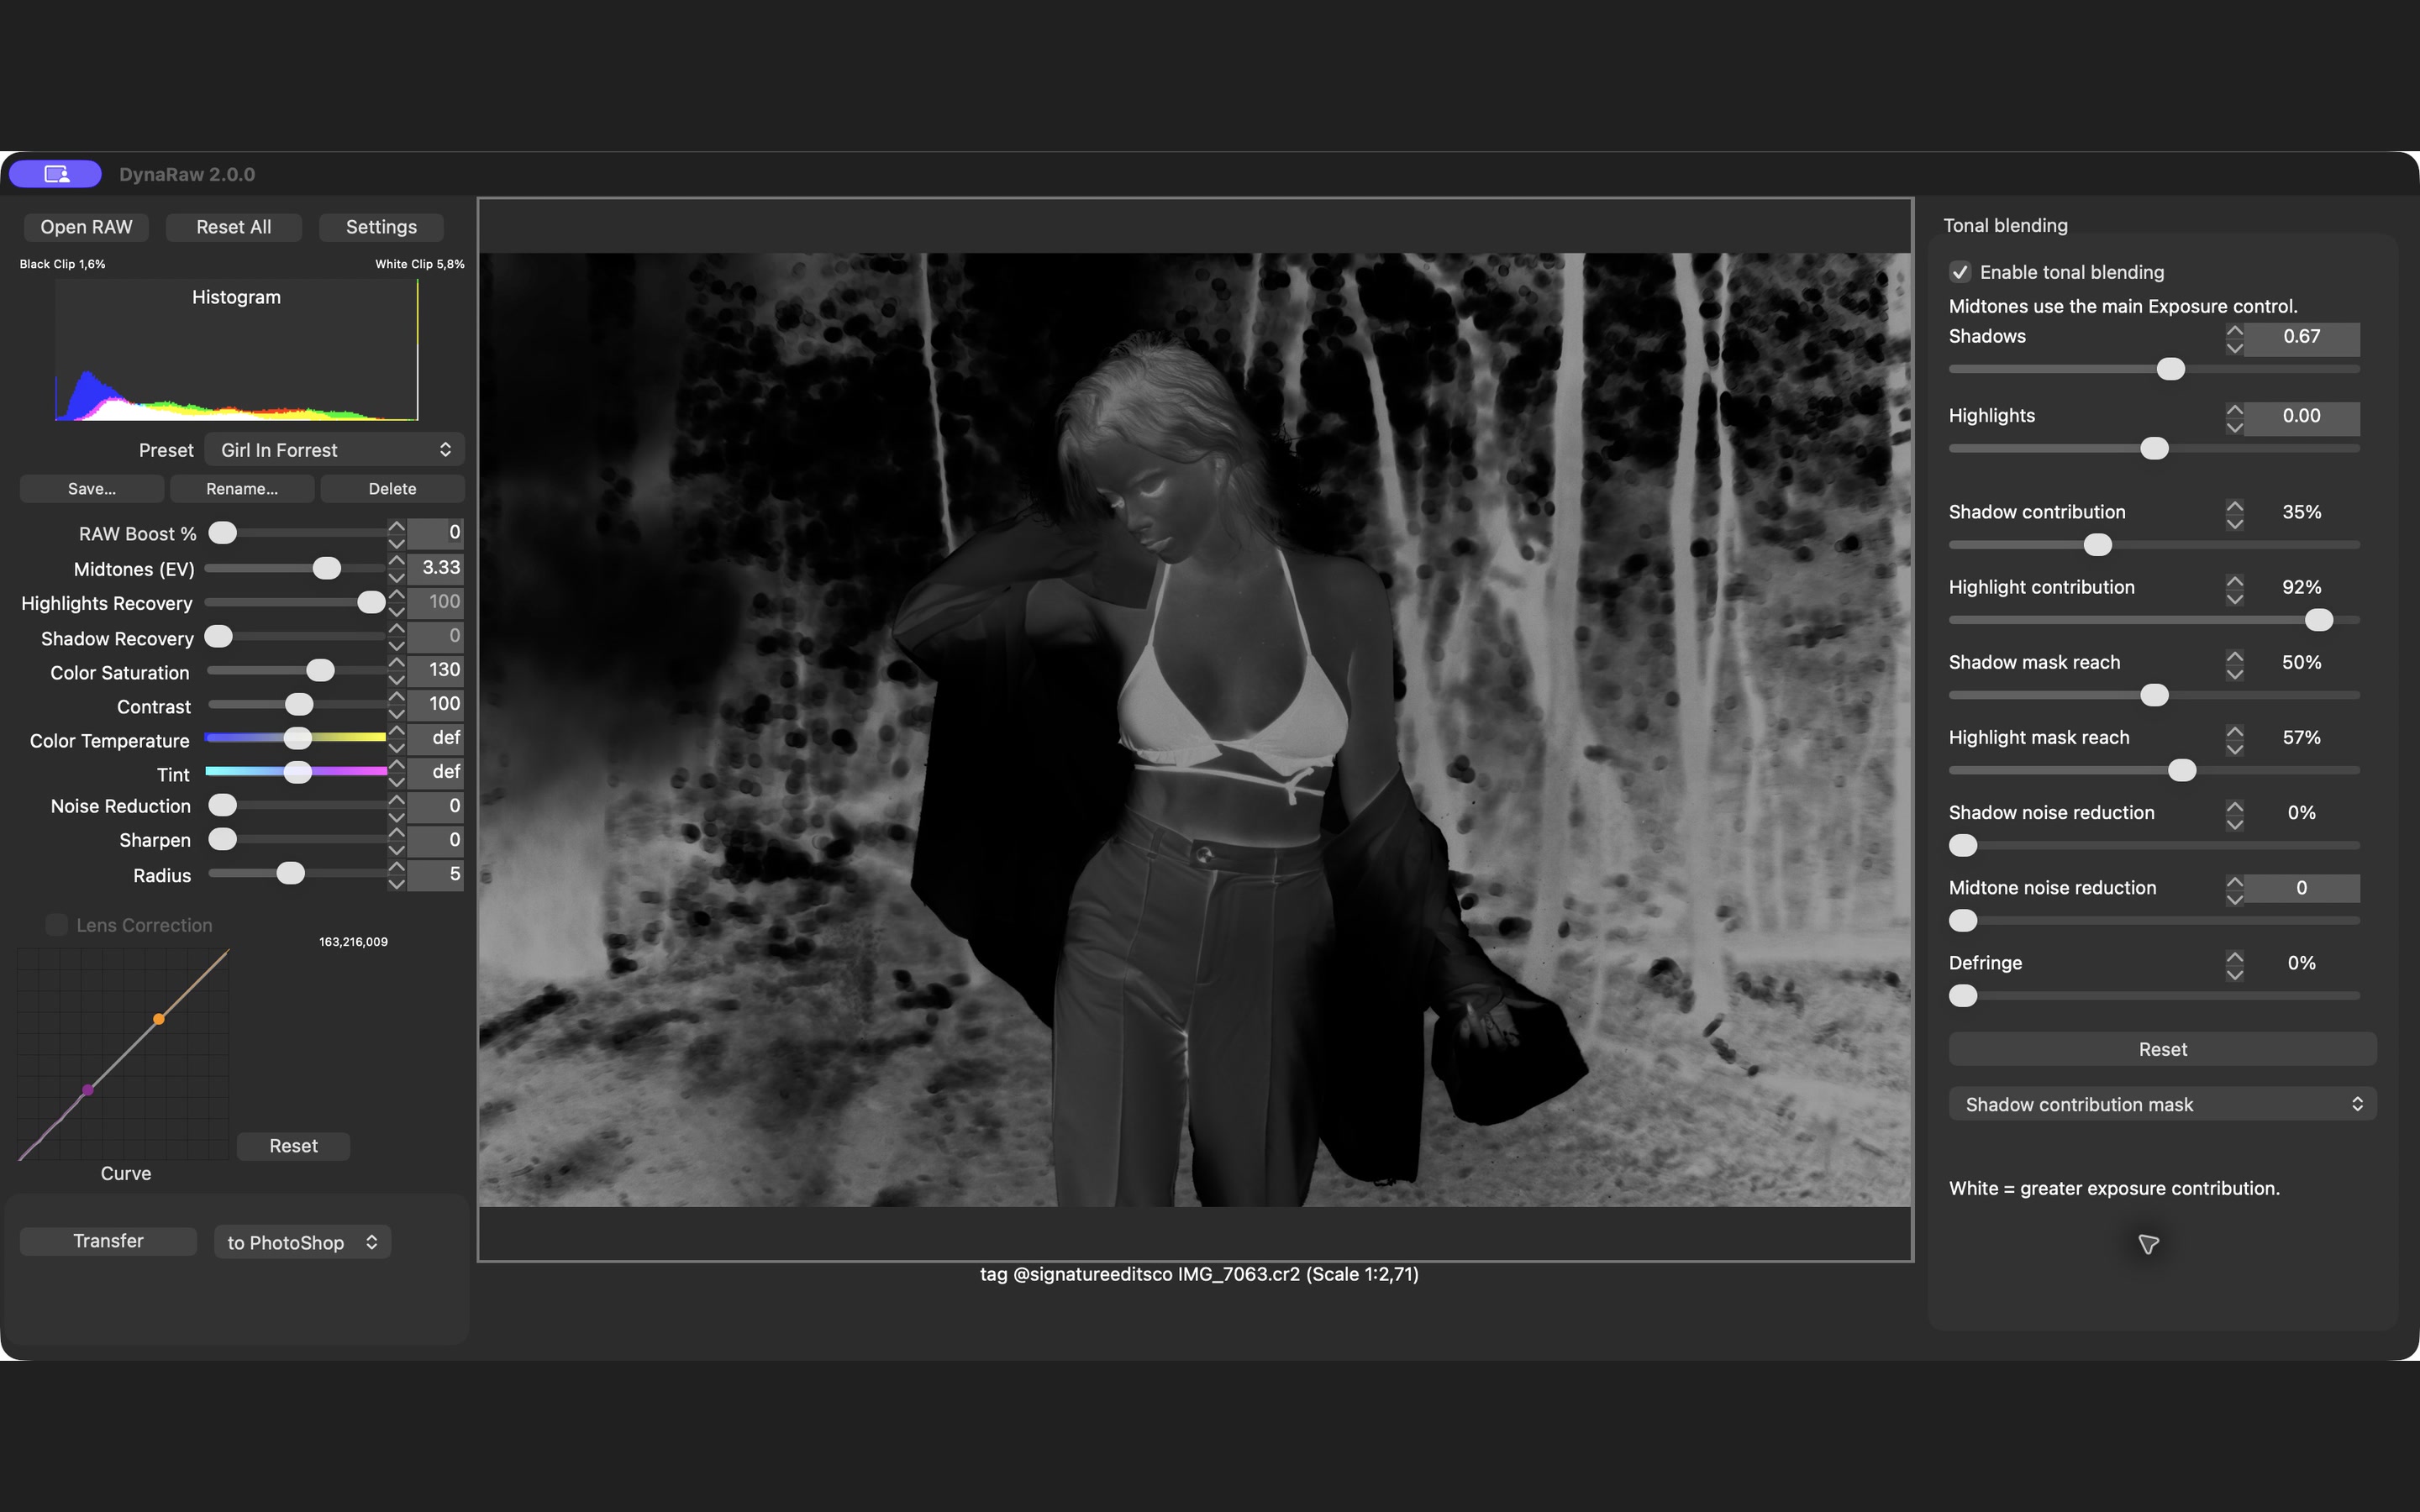
The contribution controls set how strongly each branch enters the result. Shadow contribution governs the brighter rendering. Highlight contribution governs the darker rendering. The reach controls decide how far each branch extends into neighbouring tones. Conservative reach preserves local contrast and avoids the flat, artificial look associated with aggressive high dynamic range processing.
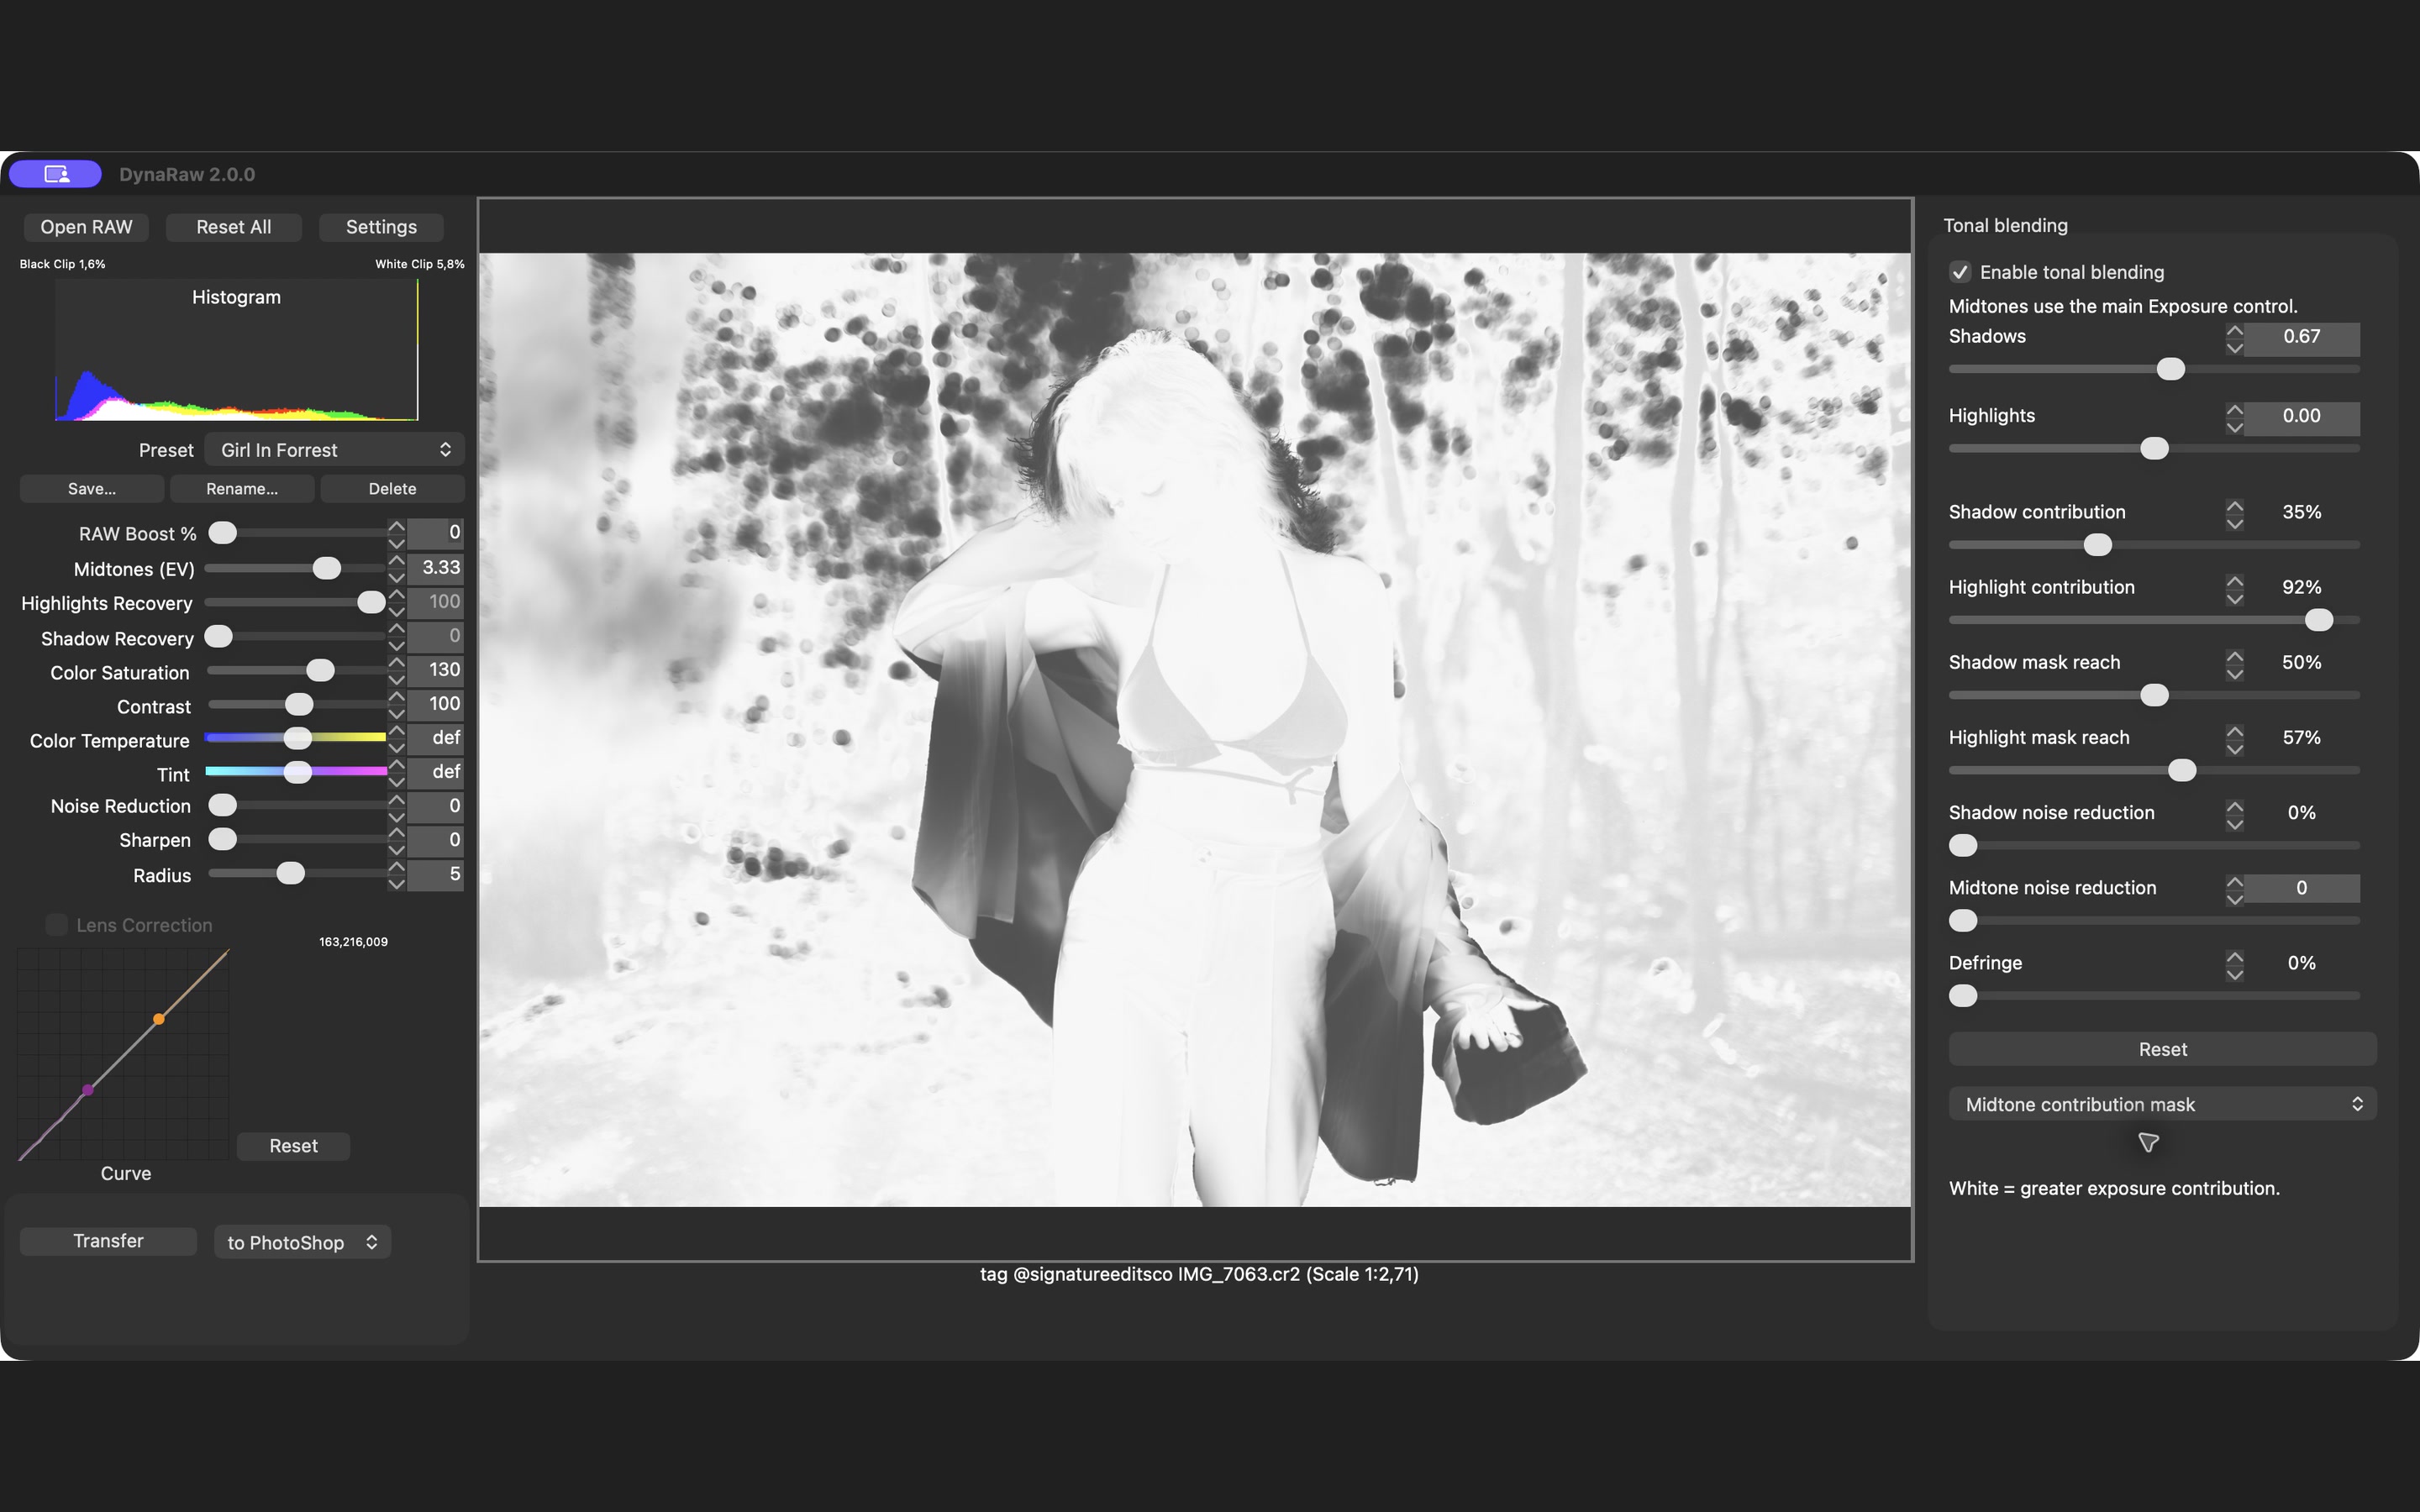
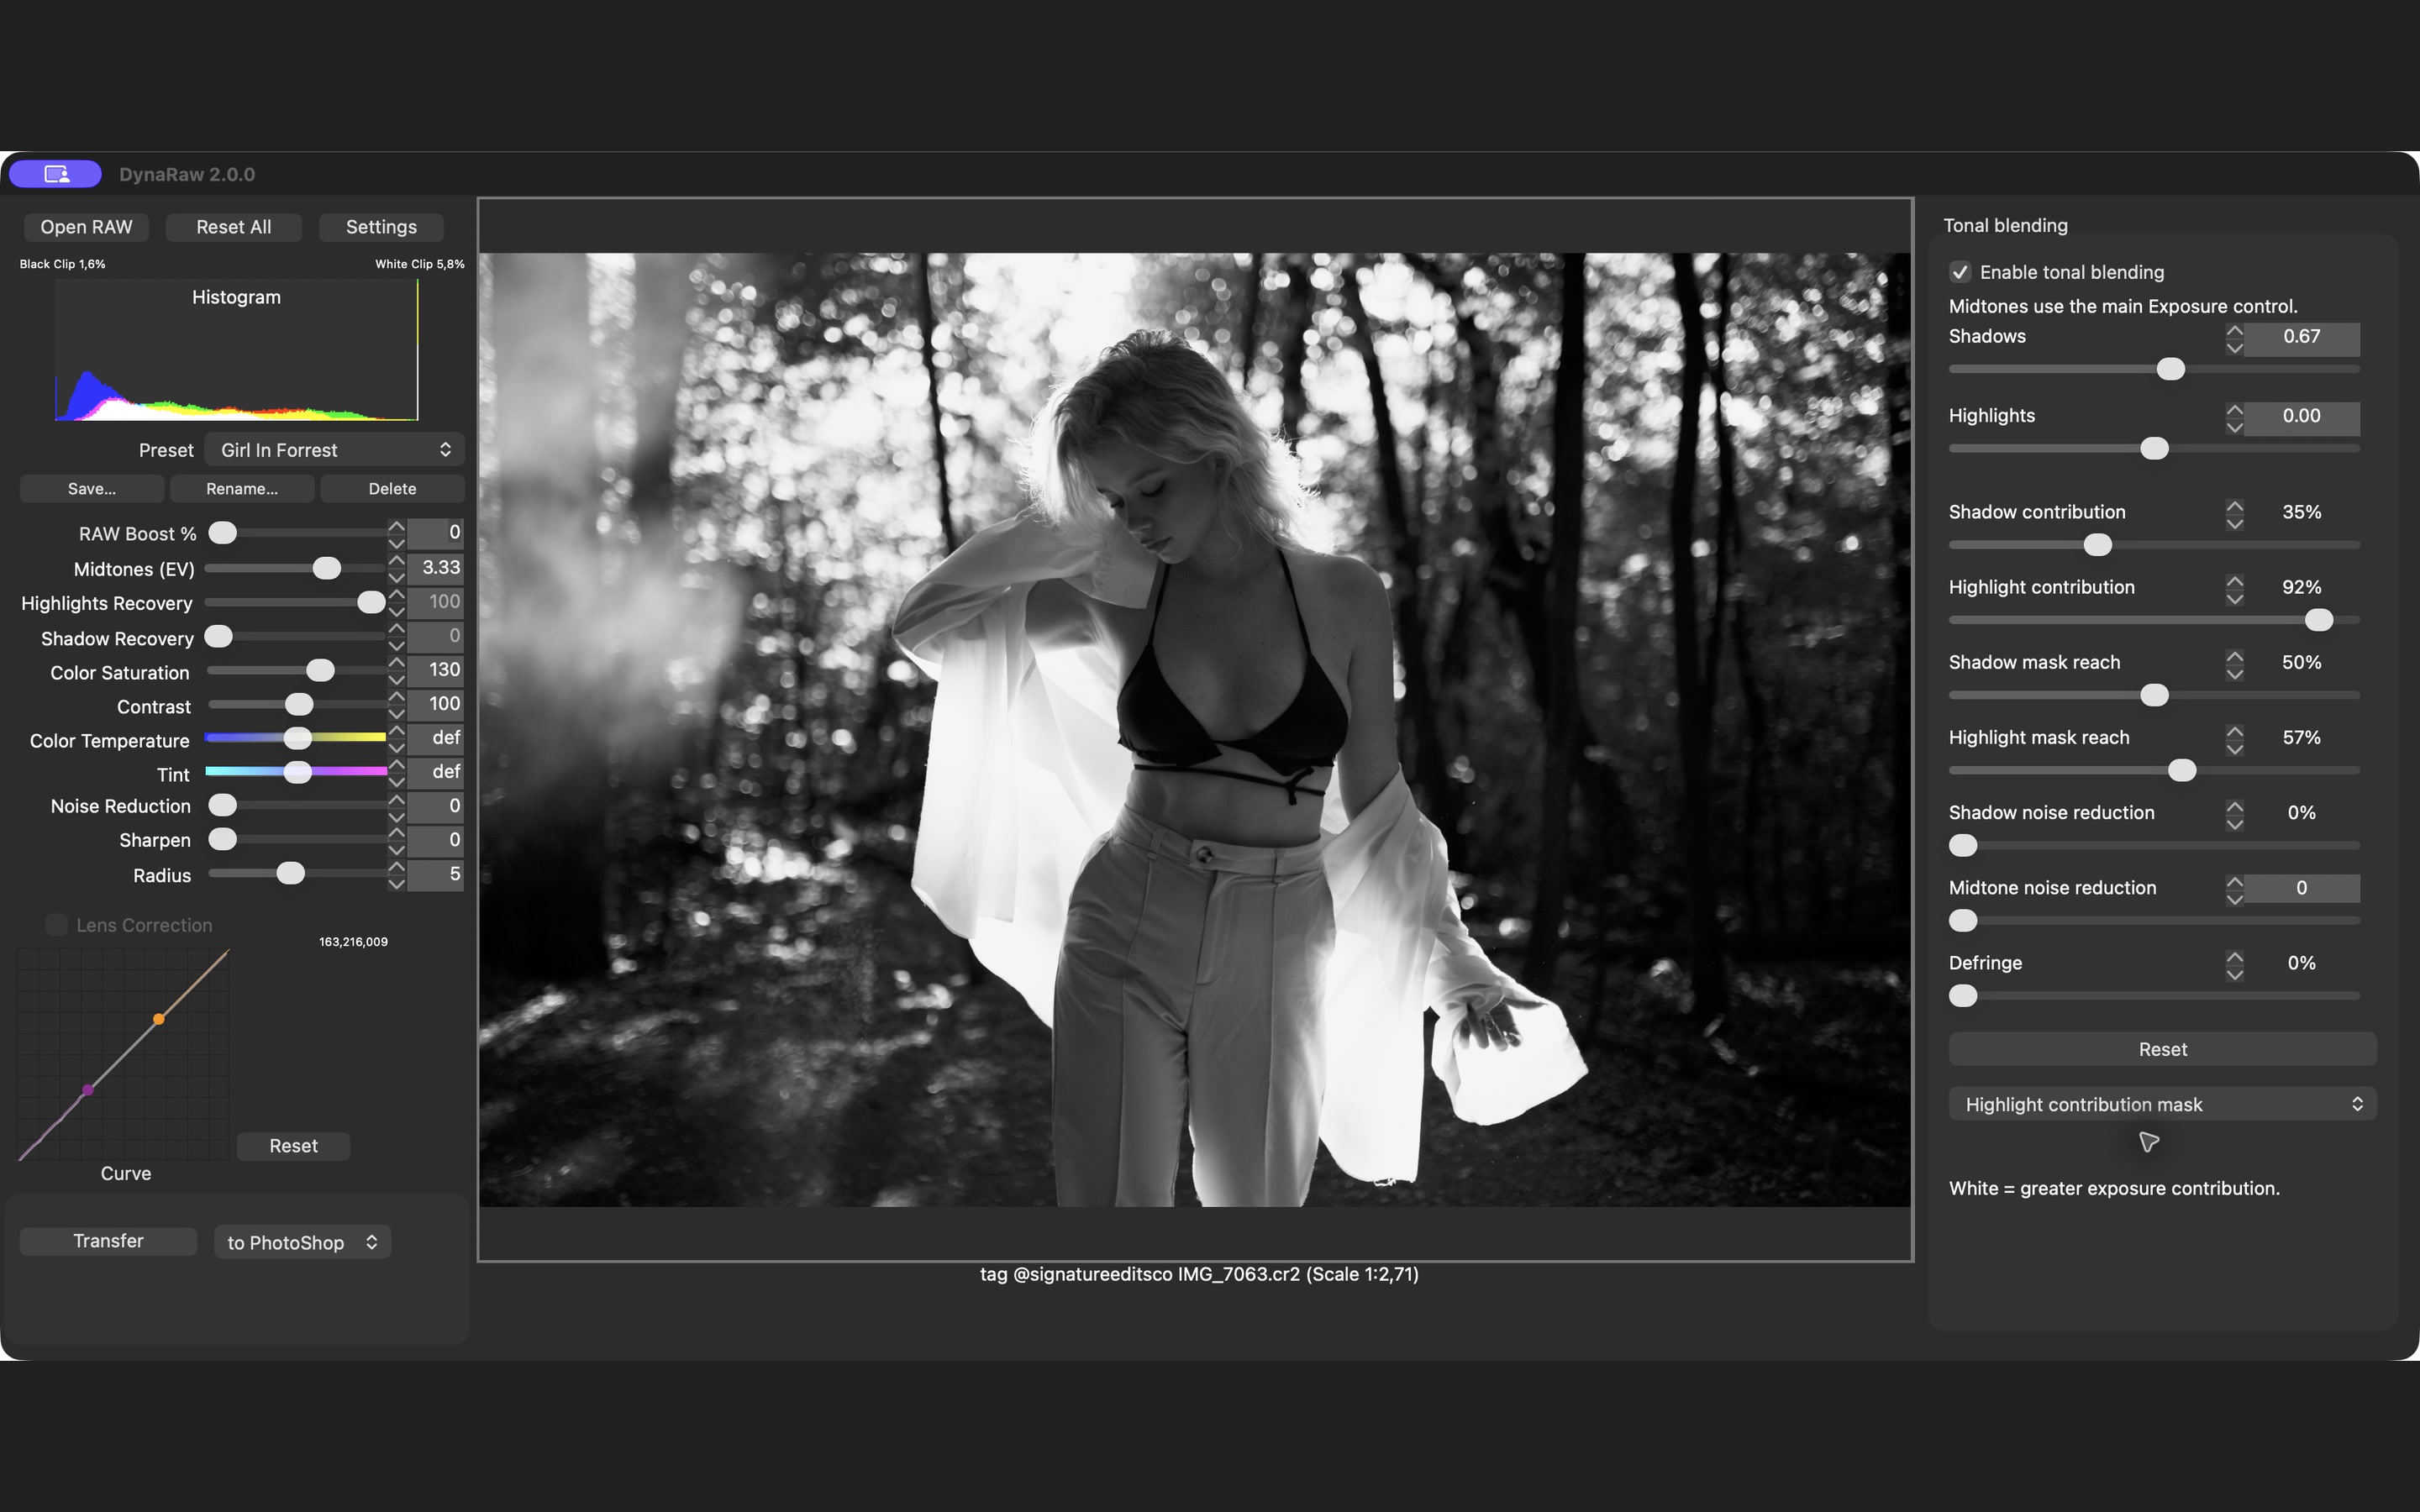
The masks make that selection visible. In the shadow mask, lighter areas receive more of the bright branch, while darker areas are protected from it. The highlight mask shows where the darker branch is allowed to act. Grey regions are gradual transitions, so there are no hard cut-outs around the subject.
For this portrait, the highlight mask reaches across the backlit hair, shirt, and bright foliage, while the shadow branch is restrained enough to keep the face natural. The preset is not chasing maximum brightness. It is preserving usable detail while keeping the lighting believable and the controls explicit.
At normal window size, the fitted preview is scaled down, so it cannot reveal final noise or fine texture. Move the magnifier over the hair highlight for a true one-hundred-percent check. These two views compare the same small area without tonal blending and in the final result. This is where you judge individual strands, sharpening, and noise reduction.
The final result keeps the sunlit material readable and lifts the shaded subject without turning the forest flat. Start with modest contributions. Inspect the branch exposures, inspect the masks, and check detail at one hundred percent. Dyna Raw keeps every tonal decision visible, while preserving floating-point processing, genuine sixteen-bit TIFF saving, and direct transfer to Photoshop.
DETAILS IM FOKUS. SIE ENTSCHEIDEN.
Entwickeln Sie dieselbe RAW-Datei getrennt für Schatten, Mitteltöne und Lichter. Kombinieren Sie diese über einstellbare Beiträge und Maskenreichweiten und prüfen Sie jede Belichtung und Maske direkt.
Speichern Sie benannte Bildvorgaben für RAW, Farbe, Kurven, Tonwertmischung und Skalierung. Separate Ausgabevorgaben bewahren JPEG-Qualität, Bittiefe und ICC-Profilwahl. Vorgaben lassen sich laden, umbenennen und entfernen.
Vergleichen Sie die ursprüngliche RAW-Entwicklung mit dem bearbeiteten Ergebnis in der Lupe mit voller Auflösung. Beurteilen Sie Textur, Rauschen und Schärfung bei tatsächlicher Pixelgröße.
Nutzen Sie Schatten- und Mittelton-Rauschreduzierung in Vorschau, Lupe und Export. Optionale lokale Core-ML-KI läuft auf unterstützten Apple-Silicon-Macs und passt die Kachelgröße an den verfügbaren Speicher an. Core Image bleibt verfügbar, wenn KI ausgeschaltet oder nicht verfügbar ist.
Arbeiten Sie mit Live-Kurven sowie Reglern für Belichtung, Weißabgleich, Farbe und Details. DynaRaw fügt kein verstecktes Tone-Mapping oder keine automatische Lichterkompression hinzu; die Gleitkommapipeline priorisiert Bilddetails.
Bewahren Sie echte 16-Bit-Ausgabe für TIFF, PNG, Photoshop und Affinity Photo. Wählen Sie ICC-verwaltete Adobe-RGB- oder sRGB-Ausgabe und skalieren Sie exakt mit Live-Pixelabmessungen.
Exportieren Sie JPEG, TIFF, PNG, PDF oder SVG. Übertragen Sie direkt an Photoshop oder Affinity Photo oder verarbeiten Sie RAW-Serien mit fortlaufenden Dateinamen.
Arbeiten Sie auf Englisch, Niederländisch, Deutsch, Französisch, Spanisch, Italienisch, Japanisch oder Dänisch.
Diese Funktionen beschreiben das eingereichte macOS-Update 2.0.0, das derzeit auf die App-Store-Prüfung wartet. Im App Store ist aktuell Version 1.3.6 erhältlich. Prüfen Sie vor dem Kauf die aktuellen Anforderungen und die Verfügbarkeit.